
This bed tutorial has been a long time coming – we recently finished this project, and I’m so excited to talk about it! I know I’ve said this before, but I love just about everything Pottery Barn makes. If I had a million dollars and could furnish my entire house with their products, I would. Sadly, I don’t have that many zeros in my bank account (yet!). For YEARS now I’ve coveted their Raleigh Camelback bed…but there was no way to justify spending $1500+ on it.


Look at this cozy bed. Sooo pretty.
Thankfully Jeremy and our friend Kyle are handy, handy dudes and agreed to build it for me! If you’ve ever lived in an older home, you know that they’re not built to hold ridiculously large beds. So this tutorial is for a queen-sized bed and headboard, but you can adjust the measurements against your own box spring and mattress if you’re going for a different size.
You can get most of your materials from Home Depot, Lowes, and Joann Fabric. We went to our local lumber yard for all of our wood- Chelsea Lumber, because they’re always friendly, helpful, and we like to support local businesses when we can.

 Materials List
1: 4’x8′ piece of 1/2″ birch plywood
1: 4″x4″ board, 10 ft. length
4: 1″x12″ boards, 8 ft. length
2: 1″x2″ boards, 8 ft. length
11: 1″x4″ boards, 8 ft. length
1 box of #8-3″ deck screws (self-tapping is the key to less swear words.)
5 yards of fabric – I found this pottery barn dupe (in Natural) at Joann’s for $7/yard
2 rolls of Batting
1 sheet of 2’x 6′ upholstery foam (can find at Joann Fabrics or Home Depot)
1 can of adhesive spray
1 box 13/16″ nailheads
Beer (Optional, but really helps when you reach Part II, step 6.)
Tools Required
Staple Gun + staples
Miter Saw
Jig Saw
Hand Saw
Drill
Measuring tape
Iron
Rubber Mallet
Air Compressor + Brad gun (Optional, but can be helpful to tack things together quickly)
Instructions
Part I – Building + Upholstering the Bed
1. A day or two before assembly, you’ll need to stain the legs of the bed. Cut your 4″x4″ into 8 12″ lengths. This will not only make for a taller bed, but will also allow ample room for under-bed storage. Stain the legs with a color of your choice. We did a layered stain for darker legs, with 1 coat of Minwax Dark Walnut first, and 1 coat of Minwax Ebony on top.
2. Measure your box spring to find the dimensions for your bed frame. Add a 1/4″ to each
measurement to give your box spring a little wiggle room when placed in the frame.
3. Cut your 1″x12″ boards to match your measurements, these are the sides of your bedframe. Assemble the frame – we inset the short lengths inside the longer length sides, and secured with screws.
4. Measure your 1″x2″‘s – these will run along the long sides as slat supports. You want to leave at least 4 1/4″ at the ends to allow room for the legs. We wanted our box spring to sit flush, so we measured the height of the box spring, added the 2″ of the 1″x2″, and that determined how far from the top we needed to screw in the supports. Screwing them in flush with the bottom of the board, about 10″ from the top – this is for the sides. For the header and footer supports, attach the 1×2″ sideways and flush with the bottom, so the 2″ is sticking out – you can see this in the bottom photo below.


At this point it would be a good idea to set your box spring (we have a split box spring) inside the frame to ensure that your measurements were correct. Success!

5. Attach your legs, one at each corner, with the top of the leg sitting 10″ from the top of the 1″x12″.


6. Now it’s time to assemble the support framework. As you can see in the photo below, you’ll need to cut 3 1″x4″s to run parallel, and 8 to run perpendicular. Measure and cut the 3 parallel lengths first, because these will lie underneath the boards running perpendicular. Divide the width of the bed into quarters, and attach your boards to the support slats with screws.
7. Measure and cut the 8 perpendicular widths. Attach these boards to the support slats on the sides, with these boards laying on top of the 3 boards running parallel that you just attached. Attach the additional 4 legs – 2 each under the outside 2 parallel 1″x4″s where they meet the 3rd and 7th perpendicular boards, respectively. Below is what the bed should look like when you’re done with this step.

8. Unfold 1 roll of batting. Measure each side and cut batting to match, with an extra 2-3 inches to allow for wrapping. Wrap over the top and bottom side, and secure with staples. Repeat on all 4 sides.
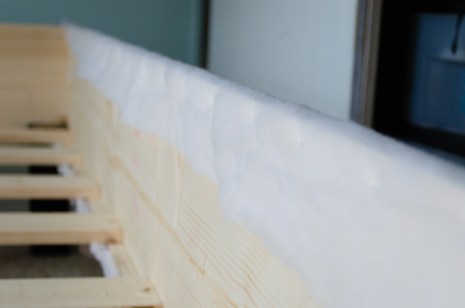

9. Cut your fabric to match each side, with an extra 2-3 inches to allow for wrapping. Iron your fabric, then much like you attached the batting, wrap the fabric over the top and bottom side, pull tightly, and secure with staples. When you get to the corners, fold over to create a seam and glue with either hot glue or fabric glue. Pull the top and bottom of the fabric at the seam over the side, and secure with staples.


Part II – Assembling + Upholstering the Headboard
Did you know there are a ton of different headboard shapes, all with their own names? I had no idea until we tackled this project. The shape of this headboard is the “Eccleston”.
 1. Stencil or freehand (we freehanded) the shape of your headboard on your 4’x8′ piece of birch plywood. Cut out your shape with a jig saw. Sand down any rough edges left by the saw, we used an orbital sander with a 220 grit pad to get a really smooth edge.

2. Lay your foam down, then place the plywood on top. Trace the shape onto your foam, and cut. We decided to attach the headboard directly to the bed, so we stopped the foam 12″ from the bottom. We were able to use 1 sheet of upholstery foam, cut in half length-wise for the entire headboard. In order to get the smoothest cut, use a small hand saw…trust me on this. We used a box cutter and it wasn’t pretty. Jagged foam edges make for difficult upholstery later on.


3. Apply a generous amount of spray adhesive to your plywood, and attach the foam. Let dry for 30-45 minutes to make sure it’s secure.
4. Unfold one roll of batting, and lay your headboard foam-down on top of it. Attach firmly with staples, but don’t pull too hard or the batting will tear. Trim the excess batting.


5. Measure and cut your fabric to fit the headboard. Iron the fabric! Upholstering with wrinkled fabric makes an already hard task even more difficult, so don’t skip this step.
6. Now it’s time to upholster! Attach your fabric with staples. This will be the most time-consuming and frustrating part of the process. Be prepared to pull staples out as you move around the headboard, to eliminate wrinkles. It’s a slow process, but don’t give up – it is so worth it when it’s done! When we got to the corners, we folded the fabric over like we were wrapping a present. We had never attempted upholstery before, so this video was a great tutorial.
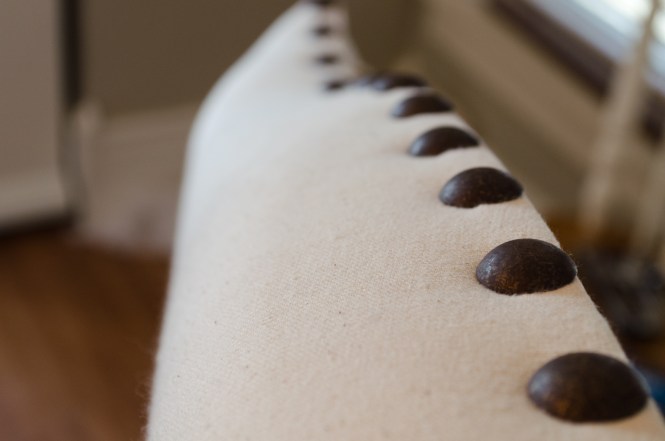
7. For the final touch, tap your nailheads into the upholstered plywood with a rubber mallet. We started at one end of the top, and spaced the nailheads out 1 1/2″, making sure to place them towards the front of the plywood so they wouldn’t overlap the back edge. You can measure out the width, or create a little template like we did – it made the process much faster. Continue all the way down both sides.


8. If you’re attaching directly to the bed like we did, add your 1″x2″ strips along the bottom of the foam. Here are some examples of how the bed will sit on the frame:


9. Attach your headboard to the frame. If you have someone to help hold the headboard up while you’re screwing it in to the back frame board, great! If not, clamps can help as well. Screw it in until secure, and you’re done!


Looks like the real thing, and is Murphy-approved. Now we just have to find some cozy new bedding to fit our new bed. What do you think? A HUGE thanks goes to Kyle for making the drive from Kalamazoo to spend a few days to help us – you’re the best!


If you attempt this project, please comment on how it went for you – and send photos!


